# Lesson 16: Fault Tolerance
## Roadmap
You are in **System Design Interview Prep**, Track 01, **Core Fundamentals**: lesson 16 of 19 (fault vs failure, zones and blast radius). It builds on [Lesson 15: Consistency Models](../15-consistency-models/README.md). Next comes [Lesson 17: Single Point of Failure](../17-single-point-of-failure/README.md).
These are the written notes for the lesson's video. Prefer paper? The same notes are a free, printable PDF: [download SD-A-016.pdf](https://backendroadmap.com/notes/system-design/SD-A-016.pdf).
## Concept
> [!key] Faults (a disk dies, a bad deploy) are certain; fault tolerance stops them becoming failures (users affected) through redundancy, isolation and fast detection.
## Explanation
### Fault vs failure
A **fault** is one component going wrong: a disk fails, a process crashes, a dependency slows down. A **failure** is the whole system no longer serving users. Fault tolerance means stopping faults from turning into failures.
| Kind of fault | Examples |
|---|---|
| **Hardware** | Dead disks, bad memory, power or network loss |
| **Software** | Bugs, memory leaks, a dependency that slows to a crawl, a retry storm |
| **Human** | A wrong config, a bad deploy, a deleted table. In practice a large share of outages. |
### How to tolerate faults
- **Redundancy and replication:** more than one copy of every important thing.
- **Isolation:** a problem in one part can't spread to the rest.
- **Fast detection:** health checks, heartbeats and timeouts move traffic away from broken parts automatically.
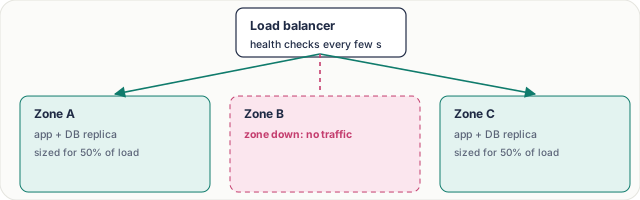
*Figure 1. Replicas in three availability zones. If one zone goes down, the load balancer stops sending it traffic and the other two carry the load.*
> [!example] **Plan capacity for a zone loss.** With three zones at peak, each normally carries a third of the traffic. If one fails, the other two must carry half each. So each zone must be sized for ~50% of peak, about 1.5× its normal share. Without that headroom, losing one zone overloads the other two and turns a fault into a failure.
### Blast radius
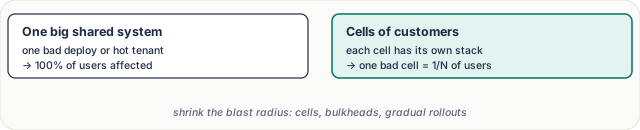
*Figure 2. Cells limit how many users one problem can reach.*
- **Cells or shards of customers:** each slice of users gets its own stack; a bad cell affects only its slice.
- **Bulkheads:** separate thread or connection pools per dependency, so one slow dependency can't use up all the workers.
- **Gradual rollouts:** canary to 1% of traffic, watch the metrics, then widen, with automatic rollback.
> [!model] **The mindset: design for failure.** Assume every component will fail. For each box ask “what happens when this dies?”, then test it on purpose with chaos experiments (kill an instance, cut a zone, slow a dependency) before reality does.
## Key terms
| Term | Meaning |
|---|---|
| **Fault** | one component misbehaves |
| **Failure** | users are affected |
| **Availability zone** | separate data centre in a region |
| **Blast radius** | how much breaks when something fails |
| **Bulkhead** | isolated pool per dependency |
| **Chaos engineering** | breaking things on purpose to learn |
## Interview questions
Each question is tagged by kind: **Basic** (definitions), **Scenario** (apply it to a system) and **Tricky** (the follow-ups interviewers use to go deeper). Answer out loud before you open the answer.
> [!interview] What's the difference between a fault and a failure? (Basic)
What a strong answer covers
A fault is one component misbehaving; a failure is the system no longer serving users. Fault tolerance stops faults from becoming failures.
What a strong answer covers
Isolate with cells and bulkheads, spread across zones, and roll out changes gradually with canaries and automatic rollback.
What a strong answer covers
Hardware (disks, power, network), software (bugs, leaks, slow dependencies) and human (bad configs and deploys).
What a strong answer covers
Enough to survive losing one: each zone sized for about half of peak, so the remaining two can carry everything.
What a strong answer covers
Timeouts on the call, a bulkhead (separate pool) for the payment client, a circuit breaker that fails fast, and a fallback such as queueing the payment for retry.
What a strong answer covers
Treat config like code: validate it, roll it out gradually (one cell or 1% first), watch error rates, and roll back automatically.
What a strong answer covers
Only against independent faults. Replicas that share a bug, config, zone or dependency fail together; diversity and isolation matter as much as count.
What a strong answer covers
Staging rarely matches production's traffic, data and dependencies. Small, controlled experiments in production (with a kill switch) reveal real weaknesses before an outage does.